I totally enjoyed the challenge of this pattern! The FO is cozy, pretty, and impressive in a subtle way. I’ve already posted a rodekool video showing how I managed both the lacy and non-lacy rows. As I mentioned before, it took a lot of focus to get through this pattern. I found I couldn’t work on it and chat at the same time. Ultimately it’s a small project though, so despite my need for silence and privacy to work on it, I did get it done.
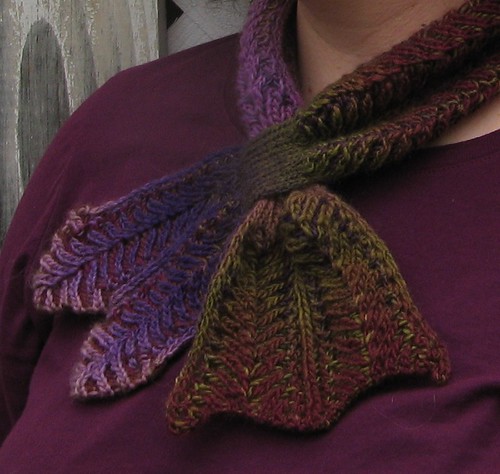
Back in February, I cast on for my very own Rodekool de Kool. Designer Nancy Marchant published Rodekool in the Deep Fall 2010 issue of Knitty — it’s still available (for free!) there. Keeping in mind that I’ve never done much (any?) brioche before tackling this “extraspicy” pattern, and also keeping in mind that this pattern involves not only brioche but also lace … it totally kicked my butt at first.
Getting through the set up rows and first few repeats of the lacy brioche pattern very nearly did me in. It took every last ounce of available mental prowess, kntterly skill, and concentration. Thankfully, once I’d accomplished those first few rows … things began to settle in. Here’s the RS and WS just after the keyhole:
So pretty, right? For once I used the called-for yarn, and (by accident) selected the same colorway as the sample, so if my version looks a bit like the photographs in the pattern, that’s why.
I’ve trucked right along on this project, but I find I can’t work on it at knitting group (chatting!) — at least not successfully. But, working on it at knitting group did help me learn how to tink lace brioche! Ugh. I have also learned how to fix (small) mistakes, and also pick up the stitches after ripping out several rows.
I’m nearly done with my Rodekool de Kool, and I wanted to share how I’ve been doing it. I’m not saying it’s totally right (though I believe it is) — naturally this is my interpretation of the pattern, and not endorsed by the designer or knitty, and so on. Usual caveats apply! In editing I already noticed that I keep calling the big decrease a “quintuple” decrease when I should have say “quadruple.” Oops. But, I also feel like I figured out a bit of a shortcut with the wrong-side rows — of course for all I know, brioche knitters already know my little trick, but just in case, I thought I’d share.
With all that, I’m sure you are dying to see what I’ve come up with. I split the video into three parts. First up: Row 1 (RS, MC)
Still with me? Here’s Row 1 (RS, CC):
The part that’s “mine” is next. Row 2 is just straight-up brioche — no lace — and fairly early on I decided it must be possible to work the stitches in a single pass, rather than doing first the MC, then the CC. Here’s my take on Row 2 (WS, MC & CC together):
I hope this was enjoyable and even useful! This is a great pattern with a lot to offer.
In the not-to-distant future, I’ll be releasing a new pattern via Knit Picks IDP. The Mhara Baby Blanket features a cool wave embellishment that is worked as you go. Here is a little “sneak peek” of the pattern, in the form of a video tutorial for how to work the CURVE8 embellishment stitch.
One of my favorite cast-on techniques for small items where the edge will be seen is a crochet cast-on. It creates a flexible, sturdy edge that looks exactly like a traditional bind-off. After watching some friends, I realized that I do it a little differently than other people.
Above: crochet cast-on edge
Below: traditional bind-off edge
See how similar they are?
You can watch the video …
… or read through the photo tutorial.
Step #1: Make a slip knot and put it on your crochet hook (the hook should be about the same size as your needle).
Step #2: Hold the knitting needle below and parallel to the crochet hook, making sure to have the working yarn behind the needle.
Step #3: Wrap the working yarn around both the needle and the crochet hook (under and in front, over and behind)
Step #4: Pinch the yarn and knitting needle with your left hand; use your right hand to pull a loop through with the crochet hook.
Result: one st on needle, one loop on crochet hook, one loop of edge created
Continue: Wrap yarn around both needle and hook, then pull a loop through
Result: two stitches on needle, one loop on hook, two loops of edge created
Continue in this manner until you are one stitch short of the total needed (N-1) on your needle. Slip the loop on the crochet hook to the needle — this is the final stitch.
Introducing my latest pattern: Berrie Pie! This adorable sleeveless dress for babies and toddlers has a knit-as-you go flower stitch pattern that is perfect for colorful hand-painted yarns. Design features include a button-up back, scalloped collar and hem, and an optional built-in diaper cover.
Inspiration: I love buying hand-painted colorful yarns, but sometimes it can be difficult to match them with a pattern. The flower-stitch pattern on the skirt of the baby dress breaks up pooling and flashing nicely, and takes full advantage of high-contrast hand-painted colorways. The scalloped neck and hem use short rows to play with color too. I designed a built-in diaper cover with snaps to make it an easy-wear garment and prevent riding up. I designed this garment with my friend’s baby girl in mind, and the prototype (in pink, below) found a home with her.
Design/Skills Needed: This is a challenging pattern with a lot of little quirks! The diaper cover is worked flat, then set aside. The skirt begins with short-row scallops and is then worked in the round using a slip-stitch flower stitch. The diaper cover is knit in at the hip. After the waist, the bodice is worked flat. Button bands and holes are worked as you go. The collar is knit separately, then joined to the neckline. Knitters should be comfortable with a wide variety of stitches and garment construction, and be willing to read the pattern closely.
I would be delighted to answer any questions or help any knitters working on this project. I made a quick video to help explain the flower stitch:
I have the same book and am working on the Scottie dog. I cannot for the life of me figure out the “pult” stitch. Could you help me? I’m pretty sure all the dogs had this stitch in them.
I feel her pain! All (?) of the dog patterns in this book use this stitch at the end of short-row shaping in the head sections. It helps close the holes created by short rows, so the stuffing doesn’t show through. I’ve done a lot of short rows in my time, mostly in sock heels and toes, but this pult stitch was new to me. At first I wasn’t sure how to do it, but I muddled through and got reasonable results. I’m not promising that I’m doing it right of course–only that this is what worked for me.
Here is the description of the stitch from the book:
pult pick up loop below next st on left needle by inserting tip of right needle from back of work through loop–this stops a hole forming when turning work–then turn, leaving rem (number stated) sts on left needle unworked
There are a few key bits:
First is identifying the loop to be picked up. In Cat Bordhi terms (from her video on lifted increases), we are focusing on the “mother” of the first stitch on the left needle.
Second is making sure to pick up it correctly: poke the right needle into that mother stitch from back to front, and leave it on the right needle.
Third is turning the work without losing any stitches. This is trickier than it sounds. Trust me.
Fourth is making sure to follow the directions for the next row correctly–every time the pult is used, the first thing on the next row is a k2tog or a p2tog, which joins the picked-up loop with the first st of the row. This ensures that the stitch count stays constant–no stitches are created or destroyed in the use of this short-row technique.
So, without further delay, here is my video of my interpretation of this technique:
One thing I would like to try is using some other short-row technique, and see if I like the results. I usually just “wrap and turn” and then work the wraps together with the wrapped stitch. Maybe when I make my next toy dog!
Recently, I’ve been teaching my friend Susie to knit. She’s a great student, in large part because she’s knit before, not to mention she crochets already (including teeny tiny crocheted bracelets made with quilting thread and #11 seed beads). As I do with most new knitters, I first taught her the knitted-on cast on, because it uses the knit stitch. This means the new knitter doesn’t have to learn some bizarro two-strand loopy thing in order to have a nice, firm cast-on row. (I never teach the backwards-loop cast on as a first cast on, because new knitters invariably stretch it out and get very discouraged.)
Susie, having finished her first project (legwarmers for her little girl), wanted to learn a stretchier cast on for the second pair. Enter the Old Norwegian Long Tail Cast On, aka the Twisted German Cast On! (The latter name always makes me think the Germans are kinky… ) I showed Susie how to do it, and made up a little set of words to say while doing it. She said it made sense to her, and wished there were a video … so without further ado, this video is for you Susie!