Tips and Tricks: Knitted Rose Pin

Recently, I finished a pretty pink scarf (see my FO Friday post on the Pinky Pink Rose Ruffled Scarf).  The pattern included directions for a very pretty knitted rose, along with directions to “Sew rose onto a round piece of felt using whipstitch and attach pin back or small stitch holder.”  There was a clear photo of the finished look of the back of the pin, but having never done this before … I was a tad intimidated.  I sought council with my friend Susie, who has made many (many!) beautiful jewelry pieces using beads, precious metal clay, et al.  She gave me some great advice, and I set out to Jo-Anns to see if I could find what I needed.

IMG_2951(rev 1)

Success!  At first I thought of using one of the stitch holders I found in the knitting section, but they were all too long for my rose.  In the jewelry-making area I found the perfect size of pin, and it even had loops (for charms) that I could use to secure it to the rose in a non-slip manner. I also bought some neutral-colored felt, and dug up some heavy-duty interfacing to help support the weight of the rose, and cut both into circles (felt slightly larger than interfacing).  Quilting thread and a sturdy needle round out my list of materials and tools.

First, I marked pencil lines on the interfacing where I wanted holes to admit the pin:

IMG_2952(rev 1)

Then, I cut the holes and threaded the pin through:

IMG_2957(rev 1)

I secured the pin to the rose with many messy loops of thread:

IMG_2958(rev 1)

Then, I hid the mess under the interfacing — poof!

IMG_2960(rev 1)

I tacked down the interfacing to further stabilize everything:

IMG_2963(rev 1)

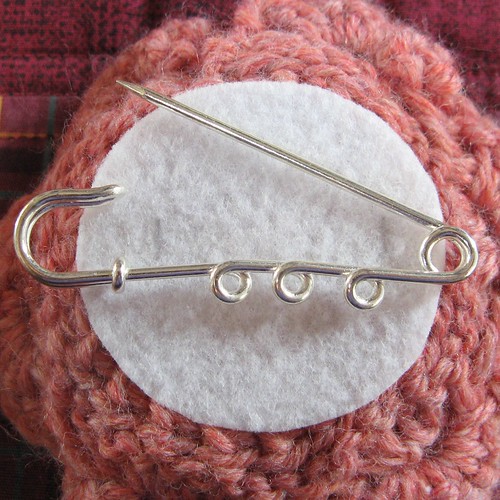
Next, I cut holes in the felt, and threaded it onto the pin:

IMG_2965(rev 1)

I whip-stitched around the edge of the felt to hold it in place:

IMG_2966(rev 1)

Voila! A pretty rose pin!

IMG_2969(rev 1)

Cast-on Monday (oops, Tuesday): Howl Cowl, Very Orange Hoodie, and swatches

Between camping out on two consecutive weekends for dog agility trials and an October snowstorm with concomitant power outages, I missed a whole week of posts!  I’ll do my best to catch up this week.

Since last we chatted, I have cast on for two new projects:

My “Howl Cowl” is for Halloween … which, thanks to the aforementioned power outages has not happened yet, so I have another week to finish and still be “on time.”  I’m using KP Stroll Tonal in “Foilage” and Gloss Fingering in “Black.” Absolutely LOVE the pattern and how the cowl is coming out.  I even love the bobbles!

IMG_3012(rev 1)

Eli’s Blue Hoodie has been outgrown and then some — not too surprising, considering I made it in 2007. Eli desires an orange replacement, “just the same but bigger.” His wish is my knitted command — I scored some lovely soft bulky-weight Duchess in Very Orange, for a brand-new Very Orange Hoodie.

IMG_3013(rev 1)


I also cast on for two different swatches, for items I will submit to Classic Elite for consideration for their Winter 2012 booklets.  I have high hopes for my colorwork capelet in Fresco and my lacy/reversible scarf/stole in Wool Bamboo, but I can’t tell you much more than that (or share photos) just yet.


FO Friday: Castlevania

IMG_2937(rev 1)

I finished my Wilhemina Shawlette! Have you noticed that I am completely addicted to one-skein, fingering-weight shawlettes?  Talk about instant gratification!

Clewe, my 10-month-old Border Collie, “volunteered” to show off his most excellent STAY and pose with the FO:

IMG_2936(rev 1)

Project: Castlevania

Pattern: Wilhelmina Shawlette

Designer: Chrissy Gardiner

Available: as a single pattern for $6, as part of the most excellent What Would Madame DeFarge Knit? for $16.95.

Yarn: Knit Picks Imagination in Castle Walls

Thoroughly addictive and beautiful lace pattern — a truly enjoyable knit. I ended up adding several extra repeats of the edging, in order to use up as much of my skein as possible. I really like the visual effect of these extra repeats.  Imagination worked beautifully for this pattern — it’s so soft and pretty, I’m almost done being mad at it for felting when made into socks ;).

IMG_2933(rev 0)

IMG_2932(rev 1)

IMG_2931(rev 1)

DIY: Magnetic Portuguese Knitting Pins


Have you ever heard of Portuguese-style knitting?  I first heard about it a few years ago, as a “better way to purl.”  At the time, I was facing loooong stretches of purling on a big, slouchy cardigan and they were killing me.  Although I learned to knit “English” as a kid (started out throwing, moved on to my own version of flicking), I had taught myself to knit “Continental” — I’m more of a picker/scooper — no high index-finger flicking for me.  I’m extremely efficient at knitting Continental, but my purling is still coming up to speed today.  When I was working on the Giant Cardigan of Doom, I could barely do a purl or two without struggling, let alone a whole.

Enter Portuguese purling: I learned to tension the yarn around my neck, holding it steady with my right hand, and flicking the yarn around the working needle with my left thumb. It was quick, with small movements — everything I loved about knitting Continental.  If you’ve never seen it before, check out this video from Knitting Daily, all about Portuguese-style knitting.

http://www.youtube.com/watch?v=gzfYS9_t27k


Now, I knew there were these pins you could use to tension the yarn, instead of throwing it around one’s neck.  But, I wasn’t keen on putting holes in the left front of all my shirts, so I mostly ignored them.  Then I saw an add for a magnetic Portuguese knitting pin.  Eureka, I thought, that’s something I could make for myself! So I did.  Here’s my first go at a button+ magnet+wire = Portuguese knitting pin:

IMG_2995(rev 1)  IMG_2997(rev 1)


Supplies:

  • button or pendant, large enough to cover the magnet
  • big strong magnets, as flat as possible
  • glue of the right sort (pay attention to the materials in your buttons and magnets)
  • bits of wire (I found make-your-own chain mail toggles to be perfect size, plus they already have a loop!)
  • tools to bend wire

IMG_2977(rev 1)


Step #1 — Glue magnet to button

Take care not to glue yourself to either!

IMG_2980(rev 1)


Step #2: Benderize the wire

What you are going for: leave a straight part about 1-2 cm long, and curl the rest into a spiral.

IMG_2982(rev 1)   IMG_2986(rev 1)


Step #3 — Glue wire to button, thusly.

Make sure the spiral is open so that yarn can slip in easily.

IMG_2987(rev 1)   IMG_2991(rev 1)


Step #4 — Let everything set for a day or two.

Seriously, don’t try to use it right away.

Cast-on Monday: Baba Yaga Mittens and Typist Mitts

This week I cast on two new projects: both for hands other than mine.

The first is a pair of Baba Yaga Mittens, made of Knit Picks Imagination in “Wicked Witch.”  These are for my friend Meg, to match her Flared Lace Smoke Ring.  She really wanted the mittens to be in the exact same yarn and colorway, but did not want stranded colorwork.  I thought that single-stranded imagination would not make the warm and durable mittens she desired.  The solution turned out to be simple: hold the Imagination double-stranded to simulate worsted-weight yarn, and make classic plain-stockinette mittens.  I decided to follow the Chicken Leg Mittens pattern (FREE! on Ravelry), and I was extremely pleased with the novel thumb-shaping technique.  The mittens worked up so fast — I was done just a few days after I started working on them.

IMG_2968(rev 1)


The second is a pair of fingerless, palmless Typist Mitts, using my own pattern: Photog Mitts.  My mom asked for a pair of these some time ago, but we only just recently got around to selecting yarn.  Since the pattern uses only 150 yards, we splurged on some gorgeous Malabrigo Silky Merino. I’m done with the first mitt, and I’m nearly done with the second — I’m holding off to check fit on my mom’s hands before I do the i-cord bind-off and finger loops.

IMG_2943(rev 1)

FO Friday: July 2011 STR Socks

IMG_2906-1(rev 1)

I continue to enjoy my Blue Moon Fiber Arts sock club socks.  This yarn is deceptively pretty, with purples and lime greens hidden in the foilage.

IMG_2911(rev 1)

Project: July 2011 STR Socks

Pattern: Fences

Designer: JC Briar

Available: sometime in July 2012

Yarn: BMFA Socks That Rock Lightweight

Pattern was great, quick and easy knit.  I shortened the toe (as I almost always do) to fit my squared-off Dutch feet.

IMG_2909(rev 0)

IMG_2900(rev 1)

Cast-On Monday: Princess Wander’s Cape, Hooligan Pixie Hat, and Sept 2011 Sock Club Socks

This week I cast on two projects destined to be store samples for the Hub Mills Factory Store. Hub Mills is the outlet store for Classic Elite, who published myKudzu and Drop Everything patterns via their free web-letter.   I’m lucky enough to be their newest employee — I’ll be working two Saturdays a month, starting after Thanksgiving when the store opens in it’s new Billerica, MA, location.  I’m so excited to be joining this group of talented knitters.  (A major “thank you!” to my friend C who recommended me for the position!) In addition to helping staff the store, I’ll be teaching classes some Saturdays — more info to come!

The first project is a cabled cape from Wrap Style: Wandering Aran Fields by Norah Gaughan.  I’m using CEY Princess in Peacock.  Princess is a great blended yarn — Wool, Rayon, Nylon, Cashmere, and Angora.  It’s super soft, but has great stitch definition.  I’ve cast on the 332 stitches for the larger size and I’m done with the ribbing.  I found out after ten rows that I was 1 st off. Rather than re-do the ribbing, I spent three hours dropping down every other row and changing knits to purls and vice versa.  It probably would have been faster to rip out and re-do, but I couldn’t face all that ribbing again!

IMG_2878(rev 1)


The second sample for the store is cabled hat from the Bounty pattern booklet: Hooligan by Susan Mills.  I’m using CEY Montera in a beautiful olive green.  This llama-wool blend is aran weight — perfect for a warm, cozy hat.

IMG_2876(rev 1)


I also cast on the latest “Notorious Sock Knitters” shipment — but we’re still in spoiler season for that, so I won’t post a photo just now.  If you’re curious, you can click through to a photo for my Sept 2011 Sock Club Socks.

FO Friday: Harmonia’s Tidepool Rings

IMG_2845(rev 1)

Project: Harmonia’s Tidepool Rings

Pattern: Harmonia’s Rings Cowl

Designer: Sivia Harding

Available: $6 on Ravelry

Yarn: Knit Picks Swish Worsted in Tidepool Heather

I’ve made this pattern before — and I wore my purple Harmonia (made from KP City Tweed) near-constantly last winter.  It’s warm, interesting to look at, flattering, and (best of all) fun to knit.  The pattern begins with a mobius cowl, with increases on one half of the stitches.  At a certain point, the non-increased half is cast off, and from their the pattern continues in the round on the increased half only. Clever construction plus a reversible pattern make for a very wearable FO.  I especially like the optional extra length and beaded picot bind-off.

IMG_2846-1(rev 0)

Cast-on Monday: Tornado Warning and Castlevania

In the last two weeks I’ve been working hard to get projects OFF the needles, but I also cast on two new projects.

The first I’m calling “Tornado Warning.”  It’s a design project, and for now I’m keeping the details top-secret because the construction is very unusual — maybe new? If it works out as expected, I will try to get it published somewhere cool, so lots of knitters can see.  I’m using gorgeous Thunderhead Tonal Stroll yarn — so pretty.

2390 KP Stroll in Thunderhead Tonal


I also cast on for the Wilhemina KAL taking place on the WWMdFK group on Ravelry.  I’m using KP Imagination in “Castle Walls” — appropriate for a Dracula-inspired pattern, no?  If you haven’t already discovered Craft Lit, start listening now!  Heather is doing Dracula right now, and it is awesome.

IMG_2899(rev 1)

New Pattern Release: Marilla’s Very Practical Shawl

Introducing my latest pattern: Marilla’s Very Practical Shawl! This Danish-style tie shawl is worked from the bottom up in worsted-weight yarn.

2644 Marilla shawl

Pattern: Marilla’s Very Practical Shawl

Designer: Rachel Henry (that’s me!)

Available: for $1.99 through Knit Picks IDP

Yarn: Knit Picks Swish Tonal

2637 marilla shawl

Inspiration: I read the Anne of Green Gables series several times over while I was growing up (and at least once as an adult).  It’s easy to like Anne—we’re meant to like her–but I always had a soft spot for Marilla Cuthbert. Prickly, practical, and tough, she protected a tender heart with a convincing façade. I like to think Marilla would have liked this shawl. It’s warm, knits up quickly, and the long Danish-style ties allow you to wrap and secure the shawl around your shoulders and waist. But, there’s just enough lace to make it pretty, too.

I made a shawl in this style a couple years ago, and I wore it all the time last winter. I loved how the ties held it in place, and allowed several different ways to wear it.  For cool days, I wore the shawl over my shoulders with the ties going directly under my arms and tied behind — like a shrug.  On frigid days, I crossed the shawl over my chest, wrapping the ties around myself before tying them behind. Both ways allowed great freedom of movement while staying warm, and pretty too!  I even wore this shawl to dog agility events.

My interpretation of this type of shawl is larger overall, with longer ties. I used worsted-weight yarn to make it warmer and faster to knit. I tried to streamline the construction to eliminate as many loose ends as possible.

2645 Marilla shawl

Design/Skills Needed: The shawl begins with the bottom edging, worked from right tip to left tip, with a short-row corner halfway through. Stitches are picked up along this bottom edge, leaving 8 repeats at both tips to form the ties. The body is worked from the bottom edge, with decreases to form the spine and top edge. After the body is completed, the neck edging is worked from right tip to left tip and joined to the body as you go.

It’s worth noting that the bottom edging uses about 40% of the yarn … so even though it takes a long time, you are nearly halfway done when you finish it! The pattern includes some charts; however, all charts are also completely written-out, for knitters who prefer to work from written directions.

Yarn: Almost any worsted-weight yarn will work with this pattern.

I would be delighted to answer any questions or help any knitters working on this project.

2639 Marilla shawl

2640 Marilla shawl (corner)