FO Friday: Mosaic Bucket Hat

IMG_5514

Project: Mosaic Bucket

Pattern: A Better Bucket

Designer: Amy Swenson

Available: FREE! on Ravelry

Yarn: my handspun from Falkland Wool Handpainted Roving by Edgewood Garden Studio

This hat is made from my very own handspun.  I was aiming for singles that could be plied into worsted on the hi speed whorl (16:1), and plied at 14.1. The colorful yarn needed something plain to be … this bucket hat is PERFECT.  It has a turned-hem brim that helps the brim stand out.  It is the tiniest bit too deep for my head, so I’ve been wearing it with the brim flipped up on one side and pinned in place with my favorite shawl pin.

IMG_5530


The Roving:

IMG_5286

The Yarn:

IMG_5416

FO Friday: Inspira Libertia Woola

Here’s a bandwagon I’m glad I hopped on:

IMG_5479

Project: Inspira Libertia Woola

Pattern: Inspira Cowl (“steampunk” variant)

Designer: celerstalk

Available: FREE! on Ravelry

Yarn: CEY Liberty Wool Print in Rainforest (MC) and Berry Brambles (CC)

It seems like everyone is making one of these, these days — and Liberty Wool is just such a perfect yarn for this simple-yet-colorful project! I’m a loose knitter, so I went down a needle size … I think I could have gone down one more, and still come out great.  The finished fabric on my cowl is soft and drapey — I’ve seen others that were much more corrugated and stand-up-on-there-own-ish.

Each time the ribs swapped places, I knit the whole round — to avoid funny purl-bump color changes.  I also stopped 12 rows early, most because I was running out of yarn … but it was also quite big enough.  This project was a joy to knit.

IMG_5214

IMG_5477

FO Friday: Aberystwyth the Quaker

This week, I have another handspun project for you …

IMG_5462

Project: Aberystwyth the Quaker

Pattern: Quaker Cowl

Designer: Lisa R. Myers

Available: FREE! on Ravelry

Yarn: my handspun, heavy worsted-ish, from A Hundred Ravens Merino Roving

This is a simple-yet-awesome pattern, perfect for colorful or slightly-irregular yarn. The cowl is worked in a simple 12-row pattern, on the bias.  The provisional cast on is grafted to the final row for a seamless finished cowl.  I will definitely be making it again.

For the curious … here’s the roving I bought…

IMG_5136


… and the yarn I made …

IMG_5288


… and a close-up of the finished look!

IMG_5463

FO Friday: Sugarbunny Cloche Divined

Seriously people … I think I have a new most-favorite hat ever:

IMG_5399

Project: Sugarbunny Cloche Divined

Pattern: Cloche Divine

Designer: Meghan Jones

Available: FREE! on Ravelry

Yarn: Knit Picks Sugarbunny in Hawk

Some time back in 2011, I made mittens for a friend.  In payment, she bought some yarn from my KP wish list: two balls of the limited-edition “Sugarbunny” merino/angora blend.  Recently I got a PM on Ravelry asking if I’d sell a ball to someone looking to finish a sweater … I couldn’t do that without making a hat first, because I knew the hat would take one full ball and a bit of the second.  Ergo: hat!

IMG_5374

This was a remarkably quick knit. I cast on Dec 15th, and finished Dec 17th.  The pattern has the entire hat knit flat and seamed, but I elected to knit in the round after the brim was complete.  There were a few things that seemed overly fiddly to me — I saw no need to cut the main yarn while putting on the “tab” that “gathers” the short rows, for example — but that is a minor quibble with an otherwise excellent (and FREE!) pattern.  The gathers are made with short row-shaping and then knitting the layers together to hold them in place. I made a size L (for my extra-big head) but began crown shaping at 7 inches (otherwise it would have been far to L, even for my extra-big head).

IMG_5360

IMG_5392

FO Friday: Heartsick Redeux

This project is for my Secret Santee … so now that Christmas has come and gone, I can share it!

IMG_5343

Project: Heartsick for SS

Pattern: Heartsick

Designer: Rachel Henry

Available: on Ravelry: $6 as a single pattern / $10 as part of the Lovelorn Collection

Yarn: BMFA Socks That Rock Lightweight — Rare Gems (Water)

IMG_5344

I feel like I just finished making the samples for the Lovelorn collection, but when I drew my friend K’s name in the Secret Santa swap … I knew exactly what I wanted to make for her.  I made her some teal Butterfly Mittens two years ago — and this yarn was definitely in the same color family.  On a second time around, Heartsick was just as fun to make.

IMG_5342

FO Friday: Borough For Sale

I finished this project a while ago, but I put off blogging about it, just in case.  These mittens are a commissioned project for someone’s mom.  I didn’t want to take the chance of spoiling the surprise!

IMG_5194

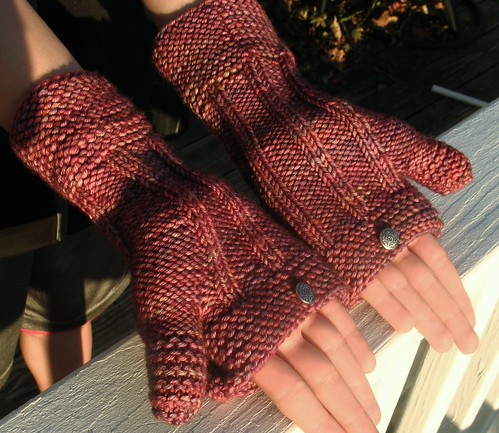
Project: Borough For Sale

Pattern: Borough

Designer: Veronica O’Neil

Available: FREE! on Ravelry

Yarn: Madelinetosh Tosh Vintage in Alizarin

I followed the pattern exactly, with one notable exception.  (See mitten surgery below!)  My friend’s mom really, really wanted flip-top mittens, but she couldn’t find what she wanted in shops.  She asked if I ever knit on commission, and I quoted her my rates … which usually scares people off.  (For custom work, I charge $0.25 per yard in the finished object.)  She didn’t even blink at the price — so we chose yarn, and I got to work.

IMG_5193


After completing the first mitten, it was clear that I would be short yarn by about ten grams.  It’s not uncommon for a pattern to be a bit off … it’s frustrating, but true.  I should have suggested ordering a second skein to be safe — especially since hand-dyed yarns like Madelinetosh can be difficult to match across skeins.  I ordered a second skein from WEBS and crossed my fingers …. but it didn’t work.  The new skein was WILDLY different — I couldn’t use it with the yarn I already had.

IMG_5190


What to do, what to do?  The pattern as written had generous cuffs.  I decided I could salvage the necessary 10 grams from the cuff of the first (already-completed) mitten, and make the second mitten with a matching shorter cuff.

To begin the surgery, I put circs through at the beginning and end of the section I planned to cut out. I was very careful to catch ALL the stitches.

IMG_4975


Next, I cut the yarn a few inches before the top, and carefully picked out the row below the circ there.

IMG_4981


It was easy to rip back to the lower circ.  I wound the salvaged yarn into a tiny precious ball, and left just enough yarn attached to graft the cuff back together.

IMG_4979


Here is the grafted cuff — you can see a bit of loose grafting if you look closely, but it is nearly seamless.

IMG_4982

FO Friday: Tips Off

A little while ago, I spun some yarn. As I mentioned, my youngest son laid claim to the yarn almost immediately. “Mom,” he said, “you never did make me those gloves with no fingers like you said you would.”  Way to lay on the guilt, kid!  🙂  On the other hand, it worked …

IMG_5337

Project: Tips Off

Pattern: improvised

Yarn: my very own handspun

IMG_5339

I used the Fried Chicken thumb increases as a starting point, and I tried doing the fingers with an increase row right before the fingers (rather than casting on and picking up stitches between the fingers.  Mixed results on the latter — I’m not convinced it’s easier or better than the usual way.

IMG_5336


Julian has been wearing these night and day — so already they are a bit worn.  It makes me so happy when something I make is well-loved.

FO Friday: Handspun Chicken Mittens

I made something out of yarn that I made!

IMG_5298

Project: Handspun Chicken Mittens

Pattern: Fried Chicken Mittens

Designer: Ellen Mason

Available: FREE! on Ravelry

Yarn: my very first handspun yarn

IMG_5301


Fried Chicken Mittens is my very favorite “just a mitten” pattern.  The way the thumb increases are done make for a superior fit!  I knew I would be a bit short on yardage, and my handspun yarn was in two or three different weights.  I started with the most irregular/bulky/fuzzy yarn at the cuff, and knit less cuff than called for.  I knit the mittens two at a time, so that if I needed to turn them into fingerless mitts, they’d be at the same point.  I joined in the mid-range yarn shortly after the cuff, and then swapped to the best yarn as that ran out.

IMG_5296


I knew I would be cutting it VERY close.

IMG_5285


As you can see, I ended up short by the tip of one thumb.  I stole a bit of yarn from the first batch spun on my new spinning wheel, and called it good.

IMG_5284

FO Friday: Hand-spinning Edition

Today’s FO Friday is brought to by Ladybug and Knittink.

I bought this braid at the Fiber Fest:

IMG_5137

(Sorry about the glow-in-the-dark look — I can’t seem to get my camera to consistently play nice with bright red/orange hues these days.)

After a bit of practice with some white wool — about 40 yards worth — I took the plunge with my fancy fiber-fest roving and my brand-new spinning wheel. I decided to go for a 2-ply worsted finished yarn. I spun on the faster groove of the “fast” whorl (not the high-speed extra one I bought for lace), and plied on the slower groove of the “fast” whorl. I divided the roving in half lengthwise, so I would have about the same amount on each of the two bobbins, and got to work.

About four hours later, I had this! Plying especially was SO much easier on the wheel, compared to the spindle.

IMG_5281

IMG_5282


My orange-loving youngest son already laid claim to this yarn, because I owe him a pair of fingered fingerless mitts.