FO Friday: Poodle for Hire

Some time ago, I donated a custom-knit dog to a raffle to benefit a friend (sad details here).  The lucky winner was the family of Zacharia the mini poodle.  Everyone say, “Aw, what a cutie!”

This project turned out to be harder than I initially anticipated.  It was hard to find the right fiber to make the poodle’s fur look right.  I ended up with Bernat Pipsqueak … which was WAY WAY to large a yarn.  So, I un-plied it, and knit with individual strands — this took a lot of time, but it gave me the look I was going for. Eventually.

Project: Poodle for Hire

Pattern: Poodle

Designer: Joanna Osborne and Sally Muir

Available: in Knit Your Own Dog: Easy-to-Follow Patterns for 25 Pedigree Pooches

Yarn: Bernat Pipsqueak and Swish DK

As I have come to expect from the KYOD series, this toy poodle was constructed in multiple flat pieces, then sewn together. I used Swish DK for the toes and face, and the Pipsqueak every else. I ended up modding the ears and tail, but other than that this was knit as-written. Doing the PULT stitch is Pipsqueak was especially exciting.

I’m not completely happy with how the legs came together with the body, but I think Knit Zacharia is recognizably a poodle … so I am satisfied.

Advertisement

FO Friday: Knit Jasper

Please say hi to Knit Jasper!

IMG_3734

IMG_3733

Project: Knit Jasper

Pattern: Siberian Husky, highly modified

Designer: Joanna Osborne and Sally Muir

Available: in Knit Your Own Dog

Yarn: Palette

A friend of mine from agility lost her dog Jasper to a sudden accident.  Before he died, she incurred some serious vet bills, and the agility community held some raffles to raise money to help her out. I donated a “custom knit mini dog” for the raffle.  Someone mentioned that they hoped the winner would give the prize to Kathy … so I decided to make her a Jasper up front, so the winner wouldn’t have to give up their prize.  (The winner, by the way, has a mini poodle — look for that project soon!)

It was hard to get started on Knit Jasper, because I wanted so badly for it to be as close to perfect as possible.  This was extra hard, because the original Jasper is not any particular breed — so there wasn’t a pattern in Knit Your Own Dog that was exactly right. Eventually I decided that the Siberian Husky was closest in shape, especially the ears and head.

IMG_3736

I charted out the written pattern for the Husky, and colored in Jasper’s signature tri-color markings. I made the legs and body just a smidge shorter to better match Jasper’s sturdy frame. Slowly he came together … I couldn’t figure out how to put a ruff around his neck without making it look like a lion’s mane, but overall I am satisfied with the doppelganger. After I took photos, I decided to tip the right ear — I soaked it in water, pinched it in a chip clip, and let it dry overnight.  The tipped ear really helps the look!

jasper face

jasper at Kathy

Here’s another pair of knit vs. original photos — it’s important to get rears right too!

IMG_3735

jasper

So long Jasper, happy trails to you.

IMG_3737

Cast-on Monday: Knit Your Own Dog

I started a special project over the weekend … something I’ve been stalling on, because it is so important to get it right. I’m making a custom knit-dog for a friend who lost her dog recently, without warning.  My “agility family” held a raffle to help cover the vet bills, and I donated a custom-knit dog.  Someone commented to me that they hoped the winner would give it back to the person who lost her dog — and I said, well heck, I can just knit her one regardless. I didn’t want the winner of the raffle to feel like they had to give up their prize.

But, the dog in question is a mixed-breed dog — none of the patterns in the NYOD book are perfect.  Faced with the daunting task of memorialized a beloved companion, with his own unique look, I have waited and pondered and waited some more.  Last night I settled on the right “base” pattern, that I will modify (mostly in color) to achieve a look close to the much-missed original.  Wish me luck!

FO Friday: C-ATCH William

As promised, here’s William!

IMG_3377IMG_3375

IMG_3378

Or, as he will now officially titled:

C-ATCH Hawkhaven Sweet William O’Mine

IMG_3425

Project: C-ATCH William

Pattern: Scottish Terrier

Designer: Joanna Osborne and Sally Muir

Available: in Knit Your Own Dog (currently $10.17 on Amazon!)

Yarn: Knit Picks Palette in …. mmmm… a heathered black, a ruddy brown, and a true red (my labels have come off)

William is a present for my friend Julie, who is a fellow dog-agility competitor.  The real-life William was up for a big title last weekend: he needed one more qualifying run (“Q”) in Jackpot to earn his C-ATCH.  This title represents 40 Q’s in seven different classes, all at Level 5 of difficulty.  It’s a big deal for us agility heads! 🙂  I decided on the spur of the moment to channel some castonitis into making a cute little dog for her.  I knit for about 10 hours on Friday and Saturday, and finished!  I showed a few people, but decided not to tell her until after the Jackpot run … it was a tricky run, a non-traditional Jackpot with complex rules for gathering points.  Julie planned a conservative path, getting exactly the 44 points needed to Q.  Everyone cheered and cheered!

IMG_3391IMG_3390

This is my second “Knit Your Own Dog” project — I made a Border Collie a while ago. I found the pattern to be similar in many ways, but tailored to the breed.  He really looks like a proper little Scottie!  The legs are knit flat, then joining via some cast-on stitches to make a left and right body.  The neck and tail are worked from held body stitches.  The head does use those crazy PULT short-rows that have stymied more than a few knitters!  I’m especially proud of the tail — Julie said it was very close to correct to breed standard!  She also said the wild beard on the knit-Scottie was perfect because William’s beard is always looks like he’s been partying it up.

IMG_3386

IMG_3385

IMG_3380

Congrats Julie and William! 🙂

IMG_3466


Cast-On Monday: C-ATCH William

On Friday night, I realized I really, really wanted to make my friend Julie an itty bitty knitted Scottie dog from “Knit Your Own Dog.”  Her (real) Scottie, William, was up for a big agility title this weekend.  I cast on late Friday, and after a busy day at agility on Saturday I knit for about 8 hours to finish.  William earned his C-ATCH on Sunday — hooray! — and I was able to give Julie a mini-Scottie to celebrate the accomplishment.  I’ll give more details in another post, but here’s a little preview:

IMG_3380

IMG_3425

Tips and Tricks: pult stitch in “Knit Your Own Dog”

This post was inspired by a reader who posted on my FO Friday entry about my Toy Gromit, made from the Border Collie pattern in Knit Your Own Dog by Joanna Osborne and Sally Muir.

Emily says …

I have the same book and am working on the Scottie dog. I cannot for the life of me figure out the “pult” stitch. Could you help me? I’m pretty sure all the dogs had this stitch in them.

I feel her pain!  All (?) of the dog patterns in this book use this stitch at the end of short-row shaping in the head sections. It helps close the holes created by short rows, so the stuffing doesn’t show through.  I’ve done a lot of short rows in my time, mostly in sock heels and toes, but this pult stitch was new to me. At first I wasn’t sure how to do it, but I muddled through and got reasonable results.  I’m not promising that I’m doing it right of course–only that this is what worked for me.

Here is the description of the stitch from the book:

pult pick up loop below next st on left needle by inserting tip of right needle from back of work through loop–this stops a hole forming when turning work–then turn, leaving rem (number stated) sts on left needle unworked

There are a few key bits:

  1. First is identifying the loop to be picked up. In Cat Bordhi terms (from her video on lifted increases), we are focusing on the “mother” of the first stitch on the left needle.
  2. Second is making sure to pick up it correctly: poke the right needle into that mother stitch from back to front, and leave it on the right needle.
  3. Third is turning the work without losing any stitches. This is trickier than it sounds. Trust me.
  4. Fourth is making sure to follow the directions for the next row correctly–every time the pult is used, the first thing on the next row is a k2tog or a p2tog, which joins the picked-up loop with the first st of the row.  This ensures that the stitch count stays constant–no stitches are created or destroyed in the use of this short-row technique.

So, without further delay, here is my video of my interpretation of this technique:

One thing I would like to try is using some other short-row technique, and see if I like the results. I usually just “wrap and turn” and then work the wraps together with the wrapped stitch.  Maybe when I make my next toy dog!

FO Friday: Toy Gromit

1541 toy Gromit

Introducing …. my very own toy Gromit!  I stayed up (too) late Friday night to finish, even though I had an agility trial the next day (which means rising at ungodly early in order to drive two hours to the trial, arriving there by 7 AM). The satisfaction of leaving this sweet little toy dog completed instead of in parts was well worth the delayed bedtime.

1539 toy Gromit

Pattern: Border Collie

Designer: Joanna Osborne and Sally Muir

Available: in Knit Your Own Dog (available for $8.49 on Amazon)

Yarn: Knit Picks Palette (leftover Cream, Merlot Heather (I think), plus tiny scraps of Semolina, Edamame, and Ash)

As I mentioned in my review of Knit Your Own Dog, the pattern is made up of a billion tiny pieces, all worked flat.  After I seamed and stuffed the first leg, I thought it would be fun to show the bits that go into a toy Border Collie.  Right next to the penny is the left rear leg.  Above the leg, you can the top of the head.  The rest is just a big muddle!

1534 KYOD Border Collie bits

In this photo, the legs and body are all seamed and stuffed. I used pipe cleaners chenille stems to provide structure for the legs.  (I learned from making some cool amigurumi last year that this is absolutely necessary.) The ears are still waiting to be sewn on, and the original tail is looking awfully big … I ended up chucking it and making a smaller version than called for in the pattern, to better match my dog. I’m very impressed with how the designers achieved a very dog-like shape.  Often knit toys approximate real shapes with blobby shapes and imagination — but this one looks like the real thing!

1536 KYOD Border Collie (in progress)

For the eyes I pulled apart two strands of Edamame and Semolina, and re-plied some of each into a single strand of greeny-gold yarn to match Gromit’s eye color.  Simple French knots make surprisingly convincing eyes.  I embroidered the nose with satin stitch … I’m still not 100% satisfied, but I have decided to call it done after cutting out the stitches once or twice and starting over. The collar is made out of Ash — again, to match the real Gromit’s awesome collar (a D Dogs Designs original).

1546 toy Gromit

1547 toy Gromit

1545 toy Gromit

Book Review: Knit Your Own Dog by Sally Muir & Joanna Osborne

This book caught my eye a few weeks ago, when patterns and projects from the UK edition started popping up on Ravelry. A quick perusal revealed that there was in fact a Border Collie pattern included in the book, and it was charming! I pre-ordered the US edition on Amazon and was delighted when it arrived this week.

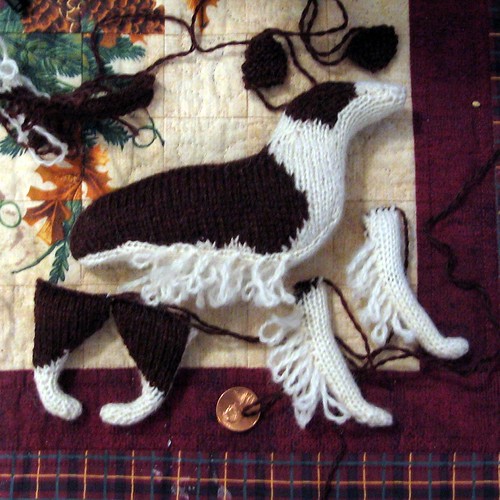
Of course, I immediately cast on for my very own Border Collie, using left-over Palette (a heathered dark brown, and cream) and Size 1 Addi Turbos.  In one evening, I was able to finish all four legs, both halves of the body, and begin on the neck and head.  As you can surmise from this list of parts, the Border Collie (and is worked in a series of bitty parts, worked flat. Some intarsia work creates the classic Border Collie markings — as with all amigurumi knitting, it is vital to knit tightly to ensure the finished toy keeps it shape and does not reveal too much of the stuffing.

The listing for this book on Ravelry is incomplete.  For this reason, I’ll provide a comprehensive list of the breed patterns here.

Hounds: Afghan Hound, Whippet, Dachshund, Basset Hound

Terriers: Wire-haired Fox Terrier, Jack Russell, Scottish Terrier, West Highland Terrier, English Bull Terrier

Sporting: Cocker Spaniel, Red Setter, Labrador, Portuguese Water Dog

Non-sporting: Dalmatian, Poodle, Miniature Schnauzer, French Bulldog, English Bulldog, Pug

Working: Rough Collie, Border Collie, German Shepherd, Old English Sheepdog, Corgi, Siberian Husky

I’m especially impressed with the clever shaping at the beginning of each leg to create a proper foot.  I’ve only just begun the head, and already I can tell some thoughtful shaping will make a very pretty head there as well. The selection of breeds is fantastic — a smattering from across the spectrum, including many of my personal favorites. The details that make each breed unique are fantastic: the Afghan’s flowing coat, the Basset’s floppy garter-stitch ears and jowls, the Scotty’s fringe and beard, the upright stance of the Poodle, the smooshed face of the Bulldog, the Collie’s exuberant mane … all will ring true to lovers of each breed. The authors provide helpful tips in selecting yarns that will best create the coat of each breed (boucle for the Porty! genious!), in addition to all the detailed shaping and design.

I do have a few minor quibbles.  Because the directions are written line-by-line, the knitter must follow along and trust that the color changes and shaping will lead them to the finished product.  It reminds me a bit of the first time I made a Baby Surprise Jacket — take a deep breath, dive in, be precise in following directions, and it will all turn out all right in the end.  That said, I find myself wanting to make charts, especially with the color changes, so I can more easily adapt the pattern to match my own dog. It would have been lovely to have a bit more explanation about the purpose of each shaping section, and charts to make customization easier.

1151 Gromit CL3After I make a toy Gromit, I’ll probably make toy versions of some of my agility-friends’ dogs.  I’m thinking a Scottie or two would be well-received, and I think I could adapt the Dalmatian pattern to make a big brown-spotted Pointer mix. After that … we shall see.